
Filing your return might seem like a challenging task, but TallyPrime offers a remarkably swift solution. You can now submit your GSTR-1 directly from TallyPrime, eliminating the need to visit the GST portal or perform any other manual procedures.
TallyPrime streamlines your experience, addressing your business requirements effectively. For instance, you can file GSTR-1 using your preferred method, such as Digital Signature Certificate (DSC) or Electronic Verification Code (EVC). Additionally, you have the flexibility to pause and resume the filing process at your convenience.
TallyPrime also assists in managing any disruptions during the GSTR-1 filing. If discrepancies arise between the transactions in your records and those on the portal, you can promptly resolve them and continue the filing process. There's no need to manually download such transactions from the portal and import them into TallyPrime.
By utilizing the File GSTR-1 feature, you save significant time and effort, allowing you to focus on the growth and expansion of your business. You'll always have clear visibility of your transaction statuses directly within TallyPrime.
File GSTR-1 Directly from TallyPrime
TallyPrime will help you file your GSTR-1 directly on the GST portal, using your preferred mode of filing, such as Digital Signature Certificate (DSC) or Electronic Verification Code (EVC).
File GSTR-1 Using EVC
Once you have resolved any uncertain transactions in GSTR-1 and uploaded your returns, you are all set to file your GSTR-1 using EVC.
- Press Alt+Z (Exchange) > File GSTR-1.
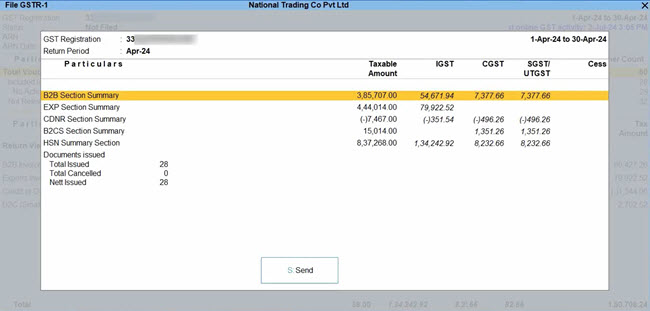
In the File GSTR-1 screen, you can view and verify the details of your GSTR-1 summary.

- Press S (Send) to start the filing process.
- Log in to your GST profile, if you have not already done so.
- Enter your GST Username.

- Enter the OTP received on your registered mobile number and e-mail address, after which your vouchers will be exported to the GST portal.

Once you have logged in, the session will be valid for six hours, which will ensure the safety and security of your activities.
Once GSTR-1 filing is initiated, you can track the progress across different stages of filing.

- Enter your GST Username.
- Press C (Continue Filing), if the downloaded summary is matching the summary in your books.
If the summaries are not matching, then TallyPrime will help you in easily identifying and resolving the mismatches.

- Press E (Electronic Verification Code) to select EVC as the Mode of Filing, if it is not already selected in company features.

- Enter your PAN.

- Enter the EVC received on the registered mobile number of the Authorised Signatory.

As GSTR-1 is being filed, you can easily track each step of the process.

Once GSTR-1 filing is successful, an ARN will be generated for your filing activity, which you can note for future reference.

For a clear picture of the details filed in this session, you can press V (View Summary).

File GSTR-1 Using DSC
Once you have resolved any uncertain transactions in GSTR-1 and uploaded your returns, you are all set to file your GSTR-1 using DSC.
- Press Alt+Z (Exchange) > File GSTR-1.
In the File GSTR-1 screen, you can view and verify the details of your GSTR-1 summary.
- Press S (Send) to start the filing process.
- Log in to your GST profile, if you have not already done so.
- Enter your GST Username.
- Enter the OTP received on your registered mobile number and e-mail address, after which your vouchers will be exported to the GST portal.
Once you have logged in, the session will be valid for six hours, which will ensure the safety and security of your activities.
Once GSTR-1 filing is initiated, you can track the progress across different stages of filing.
- Enter your GST Username.
- Press C (Continue Filing), if the downloaded summary is matching the summary in your books.
If the summaries are not matching, then TallyPrime will help you in easily identifying and resolving the mismatches.
- Press D (Digital Signature Certificate) to select DSC as the Mode of Filing, if it is not already selected in company features.
- Select the Signatory.

- Enter the User PIN received on the registered mobile number of the Signatory.

As GSTR-1 is being filed, you can easily track each step of the process.
Once GSTR-1 filing is successful, an ARN will be generated for your filing activity, which you can note for future reference.
For a clear picture of the details filed in this session, you can press V (View Summary).
GSTR-1 Filed Summary – Downloaded
The GSTR-1 Filed Summary is a handy reference for all your filing activities. You can view a month-wise report of the filing that has been completed so far, along with the relevant details such as Application Reference Number (ARN) and ARN Date. You can also easily print or share this report with your required stakeholders.
The best part is that the GSTR-1 Filed Summary will assist you in the flow of GSTR-1 filing and also whenever you want to a take a look at your filing history.
- Press Alt+G (Go To) > GSTR-1 Filed Summary – Downloaded.
Alternatively, you can open GSTR-1 and press Ctrl+H (Change View) > GSTR-1 Filed Summary – Downloaded.

- Drill down from the month for which you want to view the filing activity.

The GSTR-1 Filed Summary will give you a clear view of the registration and filing details as well as the details of the records (or vouchers) in each summary.
Resume or Restart GSTR-1 Filing
Sometimes, there might be interruptions in your GSTR-1 filing due to issues in internet connectivity or in accessing your OTP. In all such cases, TallyPrime will help you in easily restarting your filing or in resuming it right where you were interrupted.
If you are resuming the filing, then you have to ensure that the uploaded vouchers or summaries are not modified in any way after the interruption. On the other hand, if you have made any important changes in your transactions or summaries, then it would be best to reupload your GSTR-1 and restart the filing process.
- Press Alt+G (Go To) > GSTR-1.
In GSTR-1, you can view the message at the top of the report: Filing is in progress for the selected GST Registration and Period.

- Press Alt+Z (Exchange) > File GSTR-1.
In the File GSTR-1 screen, you can view and verify the details of your GSTR-1 summary.
- Press S (Send).
- Press C (Continue Filing) to resume the filing activity.
However, if you want to file GSTR-1 again from the beginning, then press T (Restart Filing).

Once GSTR-1 filing is initiated, you can track the various stages of filing.
- Press C (Continue Filing), if the downloaded summary is matching the summary in your books.
If the summaries are not matching, then TallyPrime will help you in easily identifying and resolving the mismatches.
- Press E (Electronic Verification Code) to select EVC as the Mode of Filing, if it is not already selected in company features.
- Enter your PAN.
- Enter the EVC received on the registered mobile number of the Authorised Signatory.
As GSTR-1 is being filed, you can easily track each step of the process.
Once GSTR-1 filing is successful, an ARN will be generated for your filing activity, which you can note for future reference.
For a clear picture of the details filed in this session, you can press V (View Summary).
Resolve Mismatches During GSTR-1 Filing
Sometimes there might be a mismatch between the transactions in your books and on the GST portal. This might happen when any changes are made in the books or on the portal after the vouchers have been uploaded.
However, TallyPrime will help you in easily identifying and resolving such mismatches during GSTR-1 filing.
- Press Alt+Z (Exchange) > File GSTR-1.
If there are any mismatches, then you can see the message at the top of the report: The downloaded summary is not matching the summary in your Books.

- Press V (View Mismatch). The GSTR-1 Reconciliation report opens, where you can easily view the details in the same return period and GST Registration.
If you want to make the changes in your books later, then press C (Continue Filing with Mismatch).

- Identify the mismatches in the transactions and make the necessary corrections.

Now, you can restart the filing process.
However, if the changes have to be made on the GST portal, then you have to reupload GSTR-1 and then file the returns.
The exported file will be saved in the selected Folder Path, which will be automatically opened by TallyPrime. If you have selected the Excel (Spreadsheet) format, TallyPrime will create a single MS Excel file. For CSV format, TallyPrime will create separate CSV files for each table in GSTR-1. These files have to be imported into the GST Offline Tool.
Import data and generate the JSON file
1. Open the GST Offline Tool.
Note :
Ensure that you download and install the latest version of the GST Offline Tool. The department has released GSTR Offline Tool Version 3.1.6. When using this version of the tool, complete these steps for importing data, and do a couple of simple changes as mentioned under Changes when using the GST Offline Tool Version 3.1.6.
2. Click NEW.

3. Provide the required details and click PROCEED.

4. Click IMPORT FILES.

5. Click IMPORT EXCEL and select your file, if the return details were exported from TallyPrime in the MS Excel format.
Note:
If you are using Version 3.1.6 of the GST Offline Tool, all the sections, except B2B and CDNR, will get imported. To know how to import these sheets, refer to the Changes when using the GST Offline Tool Version 3.1.6 section.

Note : To import the return details in the CSV format, select the name of the table in Select Section under Import Returns – One section at a time, and click Import CSV. You have to individually import files for each section.
6. Click YES on the warning message and click VIEW SUMMARY.

7. Click GENERATE FILE.
